- Step 1: Download the San Xin Ha application.
- Step 2: Open the app and tap the [Login] button on the [Home] screen.
- Step 3: Enter your login information: Account Number / Phone Number / Email / Citizen ID / Passport and password.
- Step 4: Enter the OTP code sent via SMS / Email.
- Step 5: Continue to the [Home] screen.
Notes:
- If you don’t have an account with SSV yet, please press the [Register] button on the [Home] screen and proceed with the eKYC account opening process.
- Your login password is the one you received via notification email (if you opened the account at the counter) or the one you created during the account opening process.

- Step 1: On the [More] screen, select the account icon
 .
. - Step 2: Tap the [Change Login password] button.
- Step 3: Enter your [Current Password] and [New Password]. Notes: The new password must meet specified requirements to proceed with the change.
- Step 4: Confirm the new password and enter the OTP code to complete the password change.

- Step 1: On the [More] screen, select the account icon
 .
. - Step 2: Tap the [Change Trading Password] button.
- Step 3: Enter your [Current Password] and [New Trading Password / OTP Static]. Notes: The new password must meet specified requirements to proceed with the change.
- Step 4: Confirm the [New Trading Password / OTP Static] and enter the OTP code to complete the change.

- Step 1: On the [More] screen, select the account icon
 .
. - Step 2: Tap the [Change Trading Password] button and press the [Reset] button to initiate the reset..
- Step 3: Create a [New Trading Password / OTP Static]. Notes: The new password must meet specified requirements to proceed with the change.
- Step 4: Confirm the [New Trading Password / OTP Static] and enter the OTP code to complete the change.

- Step 1: On the account screen, select the [Register iOTP] button.
- Step 2: Agree to the iOTP terms of use.
- Step 3: Enter the verification OTP code sent via SMS/Email.
- Step 4: Receive a notification confirming successful iOTP registration.
Notes: If you do not wish to use iOTP, you can press the [Deactivate iOTP] button and confirm to deactivate iOTP.

- Step 1: Select the [More] option.
- Step 2: In the [Favorite] section, tap the [Edit] button.
- Step 3: Tap the “-” symbol to remove tasks or the “+” symbol to add tasks.
- Step 4: Tap the [Save] button to complete the adjustments.

-
- Update Personal Information online
- Step 1: On the [More] screen, select the account icon
 .
. - Step 2: Choose the [Personal Account Information] section.
- Step 3: Tap the [Edit profile] button to adjust your information.
- Step 4: Tap the [Update] button to submit changes and wait for approval from SSV.
- Step 5: Upload or capture images of both sides of the latest ID card.
- Step 6: Perform NFC scanning.
- Step 7: Review and verify the existing and updated information.
- Step 8: Enter the OTP sent to your phone number or email address.
Note:
- Online information adjustments are only applicable to domestic individual investors and not to foreign investors.
- Can only be executed on device support NFC function.


-
- Update Personal Information online (phone and email)
- Step 1: On the [More] screen, select the account icon
 .
. - Step 2: Choose the [Personal Account Information] section.
- Step 3: Tap the [Edit profile] button to adjust your information.
- Step 4: Tap the [Update] button to submit changes and wait for approval from SSV.
- Step 5: Upload or capture images of both sides of the latest ID card.
- Step 6: Perform NFC scanning.
- Step 7: Perform facial recognition scanning.
- Step 8: Enter the OTP sent to your previous phone number or email address.
- Step 9: Review the existing and updated information for accuracy.
Note:
- Online information adjustments are only applicable to domestic individual investors and not to foreign investors.
- Can only be executed on device support NFC function.


You can change the language in two ways:
Method 1: Change the language on the [Login] screen.
Method 2: Change the language in the [More] section.

To enable biometric authentication, ensure your device supports biometric unlock methods such as fingerprint, facial recognition, or iris scan. Follow these steps:
- Step 1: Log in to your account.
- Step 2: Tap the [Setup] button in the setup prompt or go to the [More] screen and select the account icon
 .
. - Step 3: Enable the [Biometric] mode.
- Step 4: Confirm with an OTP code and perform a biometric scan to complete the setup.

Please follow the instructions below:
- Step 1: On the [More] screen, select [Default Sub-account]
- Step 2: Choose the default sub-account as requested

-
- Place a Regular Order
A regular order is a trade order executed during specified trading hours. To place a regular order, follow these steps:
- Step 1: On the main screen, select [Trade] to start placing an order.
- Step 2: Choose the trading sub-account: [00 – Cash Sub-account] or [01 – Margin Sub-account].
- Step 3: Select the stock symbol you wish to trade.
- Step 4: Tap the [Buy/Sell] button.
- Step 5: Choose the [Order Type], specify the [Buy/Sell Price] for a Limit Order (LO), and enter the [Quantity].
- Step 6: Confirm the trade order and enter the OTP code to place the order.
Alternatively, you can place an order by tapping the [Buy] or [Sell] buttons within the stock details section in 7.4.
Notes:
- To trade Odd Lots, please enter the quantity of shares accordingly.
- The order screen includes the following information: Lite/Pro interface options (1), Max Buy/Sell share quantity (2), Buying power (3), Margin rate (displayed for sub-account 01 only) (4), Estimated value (5)
- If you need additional details, tap the [Stock Info] button to view in-depth stock information (charts, fundamental indicators, company details, etc.).
- Foreign investors cannot trade on the margin sub-account (01) due to current securities regulations.
.png)
-
- Order reservation
- Step 1: Select [More], then choose [Order reservation].
- Step 2: Choose the trading sub-account: [00 – Cash Sub-account] or [01 – Margin Sub-account].
- Step 3: Select the stock symbol you wish to trade.
- Step 4: Tap the [Buy/Sell] button.
- Step 5: Choose the [Session].
- Step 6: Select [Order Type], specify the [Buy/Sell Price] for a Limit Order (LO), and enter the [Quantity].
- Step 7: Choose the time range for the order. Notes: The From Date must always be earlier than or equal to the To Date.
- Step 8: Confirm the trade order and enter the OTP code to place the order.

-
- Cancel/ Edit Order and Check Order Status
- Step 1: In the [Trade] section, select the [Order Book] button.
- Step 2: Choose the trading sub-account: [00 – Cash Sub-account] or [01 – Margin Sub-account].
- Step 3: Select the order type [Buy/Sell] and [Status] to track the status of the order.
- Step 4: Tap the [Details] arrow button of the order.
- Step 5: Choose the [Cancel Order] or [Modify Order] button as needed.
- Step 6: Confirm the action.
Notes:
For detailed trading regulations, please refer to this link.
.png)
The Securities Portfolio screen is where you can track the stock symbols you currently hold. There are two ways to monitor your portfolio:
Method 1: Quick lookup on the [Trade] screen.
- Step 1: On the main screen, select [Trade].
- Step 2: On the [Trade] screen, choose [Portfolio] to quickly view the stock symbols you own.
- Step 3: Select the trading sub-account: [00 – Cash Sub-account] or [01 – Margin Sub-account].
.png) Method 2: Full information lookup on the [Asset] screen.
Method 2: Full information lookup on the [Asset] screen.
- Step 1: On the main screen, select [Asset].
- Step 2: On the [Asset] screen, choose [Portfolio] to view the stock symbols.
- Step 3: Select the trading sub-account: [00 – Cash Sub-account] or [01 – Margin Sub-account].

Notes:
- If you need to view detailed portfolio information, tap on the details to track the specific stock symbols you’ve selected and trade using the [Buy/Sell] buttons. You can also monitor detailed information related to the stocks.
- The quantity shown only reflects the actual number of shares you hold and can trade, excluding the shares that are pending settlement.
The [Asset] screen is where you can track changes in your assets, including cash, securities, and liabilities. You can check your cash balance and securities balance in two ways:
Method 1: On the [Home] screen, you can quickly track your Net Assets, Portfolio Profit/Loss, and Available Cash. To view these, tap the [Hide/Show] button for quick access.
Method 2: View full asset details on the [Asset] screen.
- Step 1: On the main screen, select [Asset].
- Step 2: On the [Asset] screen, choose [Asset] to view detailed asset movements.
- Step 3: Select the trading sub-account: [00 – Cash Sub-account] or [01 – Margin Sub-account].
Notes: In addition to monitoring your Assets and Portfolio, you can also track your account’s trading performance in real-time by selecting [Performance]. This includes information such as:
- Net Asset Changes
- Profit/Loss over time
- Portfolio Allocation by sector or stock
- Profit/Loss from individual securities

The [History] screen allows you to track past transactions, along with your current portfolio and today's order book. To access this, follow these steps:
- Step 1: On the main screen, select [More], then choose [History].
- Step 2: Select the trading sub-account: [00 – Cash Sub-account] or [01 – Margin Sub-account].
- Step 3: Choose the following tasks to monitor:
- Select [Portfolio] to track the securities you currently hold, similar to Section 3.1.
- Select [Order Book] to track buy and sell orders placed today, similar to Section 2.3.
- Select [Order History] to track past orders. You can select the tracking period, stock symbol (leave it blank to view all securities), Order Type (Buy/Sell/All), and Order Status (Matched/Unmatched/Cancel Pending/All). To view detailed information about a specific order, tap the [Details] button next to the order you want to check.

The order confirmation screen allows you to confirm orders placed via the call center or through a broker. To confirm your orders, follow these steps:
- Step 1: On the main screen, select [More], then choose [Confirm Order].
- Step 2: Select the trading sub-account: [00 – Cash Sub-account] or [01 – Margin Sub-account].
- Step 3: Choose the tracking period and the order confirmation status (by default, the status will be "Not confirm").
- Step 4: Select the orders and click the [Confirm Order] button.

The internal securities transfer feature allows you to transfer stocks between sub-accounts. To perform the transfer, follow these steps:
- Step 1: On the main screen, select [More], then choose [Stock Transfer].
- Step 2: Select the trading sub-account: [00 – Cash Sub-account] or [01 – Margin Sub-account].
- Step 3: In the [Request] section, select the stock symbol you want to transfer.
- Step 4: Enter the number of shares you want to transfer or click [All] to select the entire quantity in the sub-account.
- Step 5: Enter the OTP and confirm the transaction.
- Step 6: In the [History] section, you can track the internal securities transfer transactions.
Notes:
- The receiving account will automatically reflect the sub-account you selected above.
- Transferring securities from the margin sub-account [01] to the cash sub-account [00] requires the settlement of all outstanding liabilities.
- This feature is not available for foreign investors in accordance with current securities laws.

To exercise your rights of buy for securities, you can check and execute your rights in the [Rights to buy] section as follows:
- Step 1: On the main screen, select [More], then choose [Rights to buy].
- Step 2: Select the trading sub-account: [00 – Cash Sub-account] or [01 – Margin Sub-account].
- Step 3: Select the available subscription right and enter the quantity in [Number of shares to buy].
- Step 4: Enter the OTP to confirm the transaction.
- Step 5: Check the history of executed Rights of buy in the [History] section.
Notes:
- To exercise Rights of buy, you need to have sufficient cash in the sub-account for the purchase.
- Rights of buy associated with shares in any sub-account will be kept separate from shares in that sub-account.

To check the expected rights in your portfolio, you can monitor them in the [Rights Info] section as follows:
- Step 1: On the main screen, select [More], then choose [Rights Info].
- Step 2: Select the stock symbol you want to check.
- Step 3: Click the button [Expected Rights for My Portfolio] to check the Rights Information.

You can withdraw cash from the [Withdraw] screen using the bank accounts previously registered. Please follow the steps below:
- Step 1: On the main screen, select [More].
- Step 2: Under the [Cash Transaction] section, select [Withdraw].
- Step 3: Select the trading account: [00 – Cash Sub-account], [01 – Margin Sub-account].
- Step 4: Under the [Request] section, choose the registered bank account to receive the funds.
- Step 5: Enter the amount to withdraw. The amount must be less than or equal to [Total withdrawable amount].
- Step 6: Click [Withdraw request] and enter the OTP to confirm.
- Step 7: Track the history of withdrawal transactions in the [History] section.

To deposit funds into your securities trading account, please follow the instructions below:
- Step 1: Log in to your bank account to initiate the transfer.
- Step 2: On the San Xin Ha app, go to [More] and select [Deposit].
- Step 3: Choose the trading account: [00 – Cash Sub-account], [01 – Margin Sub-account].
- Step 4: Select the bank for the transfer:
- Default: Shinhan Vietnam Bank and BIDV (for fast transfer processing).
- If you wish to make a regular transfer, select [Normal Deposit].
- Step 5: Scan the QR code or click [Copy] and paste it into the transfer fields in your bank app (you can also [Save Image] for later use).
Notes:
- The transfer content will be adjusted according to the language settings and the selected trading account.
- The QR code will change based on the language settings and the selected trading account.
- For foreign investors, this feature will not be available for IICA accounts due to current securities law regulations.

The internal fund transfer screen helps you transfer funds between different accounts. To perform the transfer, please follow the steps below:
- Step 1: From the main screen, select [More].
- Step 2: Under the [Cash Transaction] section, choose [Internal Transfer].
- Step 3: Select the trading account: [00 – Cash Sub-account], [01 – Margin Sub-account].
- Step 4: Enter the amount to transfer. The transfer amount must be less than or equal to [Available Amount], or click [All] to transfer the full amount in the [Available Amount].
- Step 5: Click [Transfer] and enter the OTP to confirm.
- Step 6: Track the history of your internal fund transfers under [History].

The Cash advance feature helps you when you need to purchase stocks but the proceeds from a sell order have not yet been credited to your account. To use this feature, follow these steps:
- Step 1: From the main screen, select [More].
- Step 2: Under the [Cash Transaction] section, choose [Cash in Advance].
- Step 3: Select the trading account: [00 – Cash Sub-account], [01 – Margin Sub-account].
- Step 4: Enter the amount for advance payment in the [Cash in advance remain] field. The requested amount must be less than or equal to [Cash in advance remain], or click [All] to request the entire available balance.
- Step 5: Click [Cash in advance request] and enter the OTP to confirm.
- Step 6: Track the history of advance payment transactions under [History].

You can make partial or full repayments on your margin loan under the [Margin refund] section. To make a repayment, follow these steps:
- Step 1: From the main screen, select [More].
- Step 2: In the [Cash Transaction] section, select [Margin refund].
- Step 3: Choose the trading account: [00 – Cash Sub-account], [01 – Margin Sub-account].
- Step 4: Select the margin contract, and click on the “>” button to view contract details.
- Step 5: Enter the repayment amount or click [Amount Available] or [Maximum refund] to automatically input the available repayment amount.
- Step 6: Click [Repay], review the details, and enter the OTP to confirm the repayment.
- Step 7: Review the history of repayment transactions under [History].
Notes:
- You can select any contract for repayment. However, it's advisable to prioritize contracts nearing expiration to avoid penalty interest.
- For foreign investors, this feature is not available as per current securities law regulations.

-
- Transaction Statement
You can monitor the transaction history of your account under the [Statement] section. To proceed with tracking, please follow these steps:
- Step 1: On the main screen, select [More].
- Step 2: In the [Cash Transaction] section, choose [Statement].
- Step 3: Select the transaction sub-account: [00 – Cash Sub-account], [01 – Margin Sub-account].
- Step 4: Choose the type of transaction you wish to monitor, including: All - Securities Transactions - Cash Transactions.
- Step 5: Select the time period you want to monitor.

1. Registering for Margin Trading
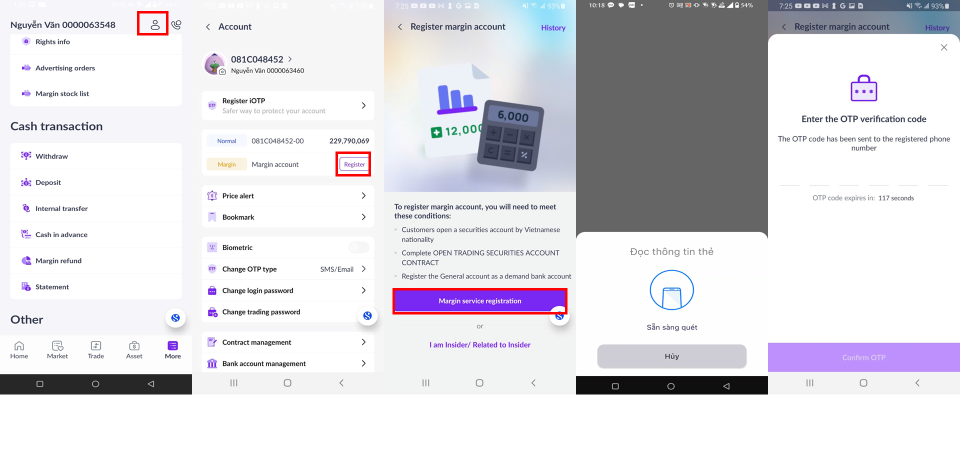
You can register for margin trading in the [Account] section of your account. To complete the registration, please follow these steps:
- Step 1: On the [More] screen, select the account icon
 .
. - Step 2: Click on the [Register] button in the [Margin] section to start the registration.
- Step 3: Press [Margin service registration] to complete the registration. If you are an insider or a major shareholder and need to disclose additional information, please click on the link below to provide the required details.
- Step 4: Perform NFC scanning as instructed.
- Step 5: Enter the OTP code to confirm your registration and follow the instructions to complete the electronic contract signing.
Notes:
- Available only to domestic individual customers who have successfully opened an eKYC account.
- Must not have an existing margin account.
- Must have completed the account opening agreement.
- Must have registered a general payment bank account.
- The margin account can only be opened on the San Xin Ha application on a mobile device with NFC function.
2. Open-end Fund trading account Registration
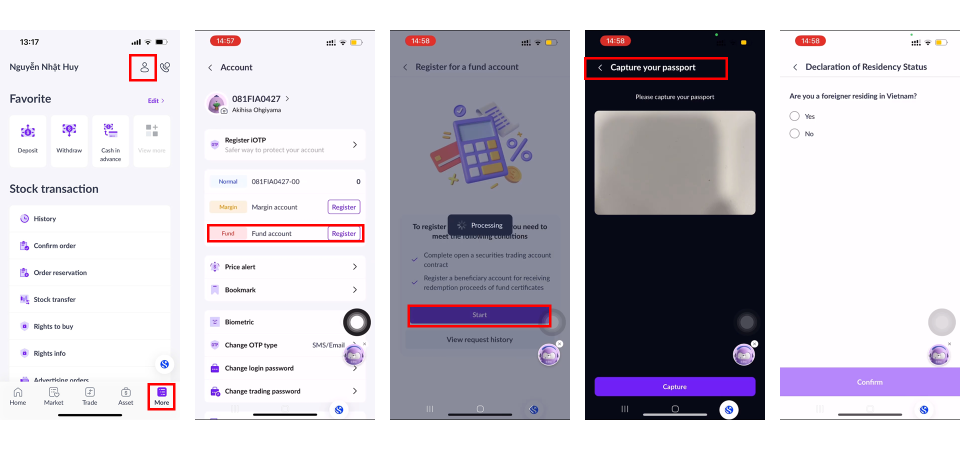
To open a open-ended fund trading account, foreigner customers are required to have a successfully opened securities trading account with Shinhan Securities Vietnam (SSV). Foreign customers can open a open-end fund trading account using the methods below:
- Step 1: On the [Home] / [More] screen, select
 icon.
icon. - Step 2: Under Account screen, select Fund Account, click Register, and choose Start.
- Step 3: Verify your information as follows:
+ For domestic individuals: You are required to perform NFC scanning if your account has not completed identity verification before.
+ For foreign individuals: You are required to capture passport images in accordance with the in-app instructions.
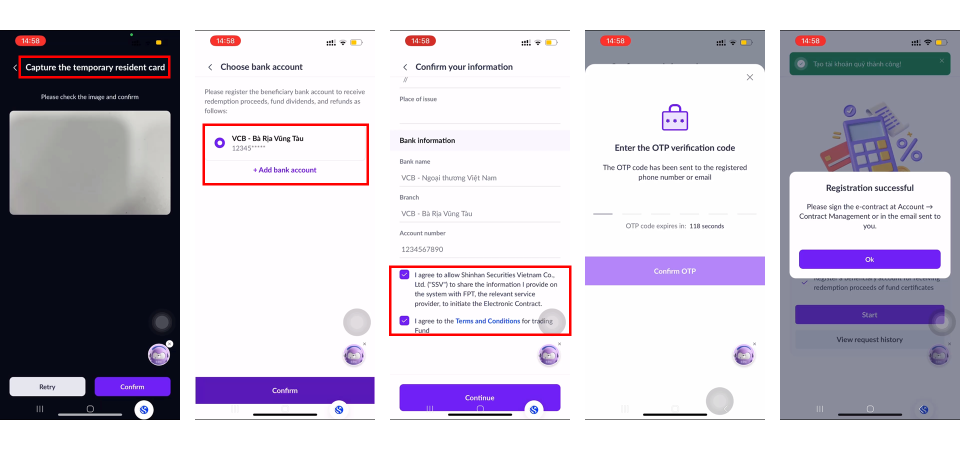
- Step 4: Register or select a beneficiary bank account for fund certificate trading.
- Step 5 Review the registration information and confirm [Agree] to the Fund Certificate opening and SSV terms & conditions.
- Step 6: Enter the OTP to confirm the registration and complete the electronic contract signing.
- Step 7: Begin trading after receiving a successful account opening notification via Email/SMS/ZNS.
3. Account Contract Management
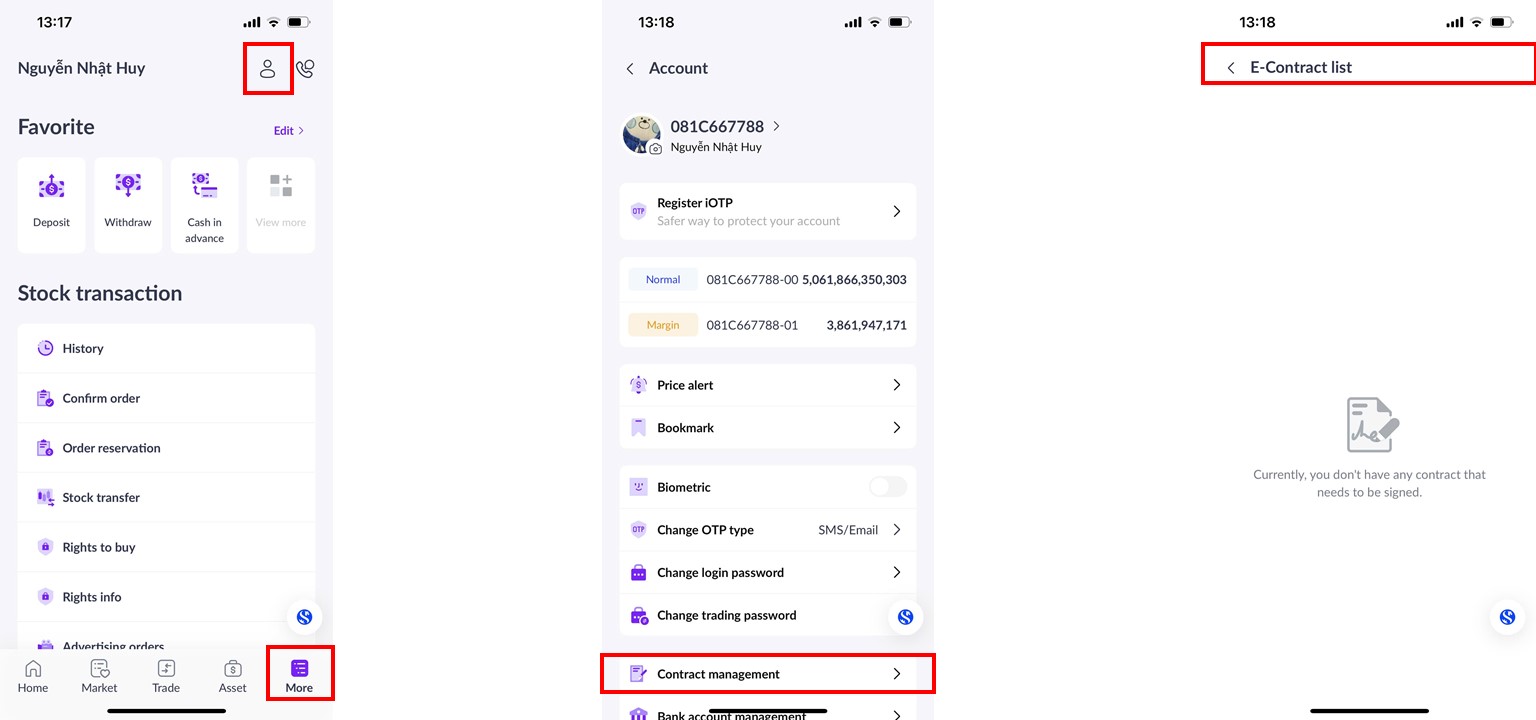
You can check the status of electronic contracts and sign contracts in the [Contract Management] section. To access this feature, please follow the steps below:
- Step 1: On the [More] screen, select the account icon
 .
. - Step 2: Choose [Contract Management] to view electronic contracts.
- Step 3: Check the status of the contract or click on the electronic contract to sign it.
4. Registering and Managing Bank Accounts
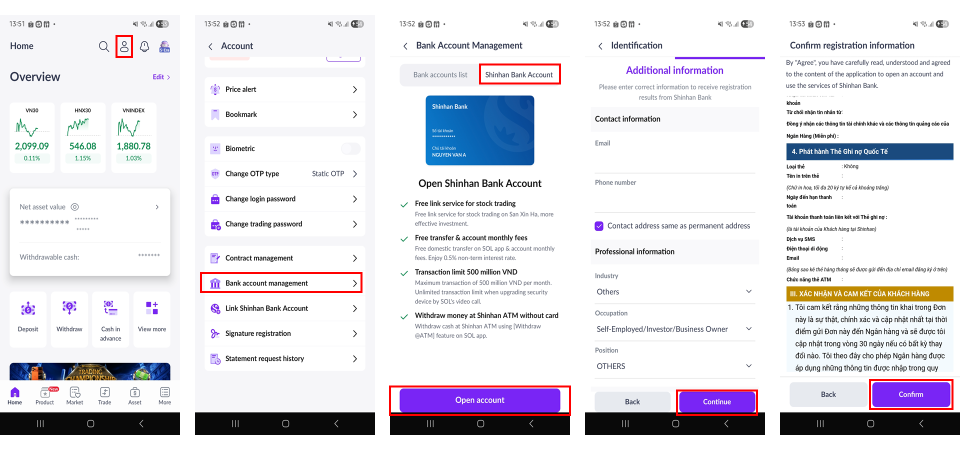
Instructions for registering a Shinhan Bank Vietnam account:
- Step 1: On the [Home] screen, select the account icon button  .
.
- Step 2: On the [Account] screen, select [Bank account management].
- Step 3: Select [Shinhan Bank Account] to proceed with registering a Shinhan Bank Vietnam account.
- Step 4: Perform NFC scanning in case information is not verified.
- Step 5: Review and provide any required additional information.
- Step 6: Review the registration details of Shinhan Bank Vietnam and select [Confirm] to confirm.
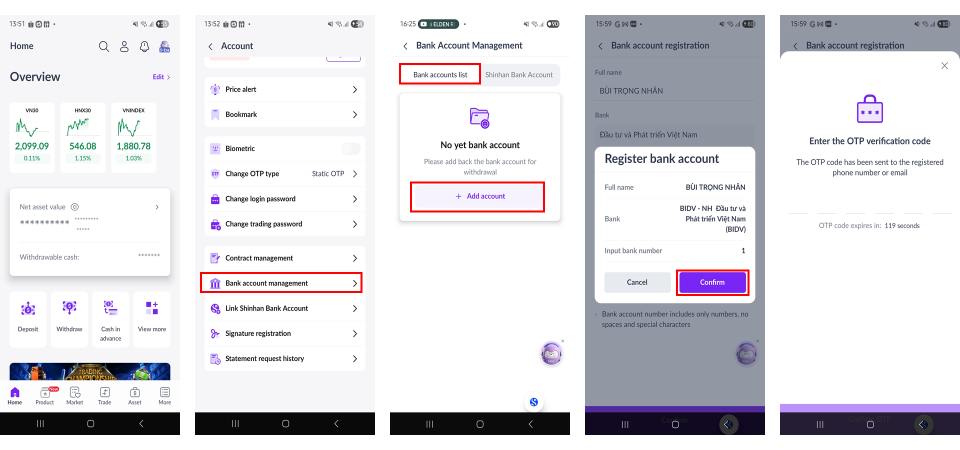
Instructions for linking a withdrawal bank account (applies to all primary bank accounts):
- Step 1: On the [Home] screen, select the account icon button  .
.
- Step 2: On the [Account] screen, select [Bank account management].
- Step 3: Select [Bank Account lists] to proceed with linking a payment bank account.
- Step 4: Choose [Add Account] and enter the information of the primary bank account.
- Step 5: Enter the OTP code to confirm the bank account registration.
Notes:
- Customer may register up to 5 payment bank accounts.
- Opening a Shinhan Bank Vietnam account is only available to domestic individual customers.
5. Registering a Signature Sample
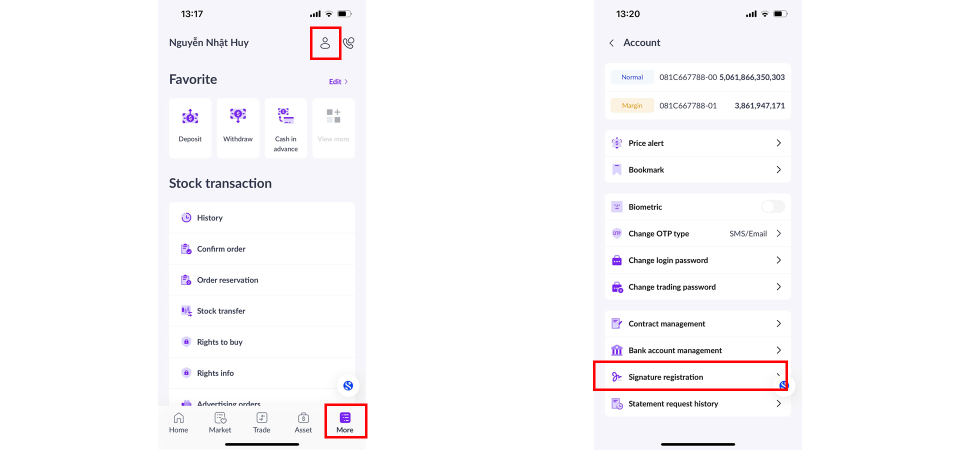
To register a signature sample, please follow these steps:
- Step 1: On the [More] screen, select the account icon

- Step 2: In the [Account] screen, choose [Signature registration].
- Step 3: Click [Register Signature] and choose [Take Photo] to capture a signature directly or [Upload Photo] to upload an existing signature image.
- Step 4: Review the image and enter the OTP code to confirm.
- Step 5: Monitor the approval status under [Status].
The Stock Price Alert feature notifies you when a stock price or specified conditions are met. To set up an alert, please follow these steps:
Method 1: Create a quick alert by pressing the alert icon “ ” in the [Stock Info] section within the stock’s detailed information page.
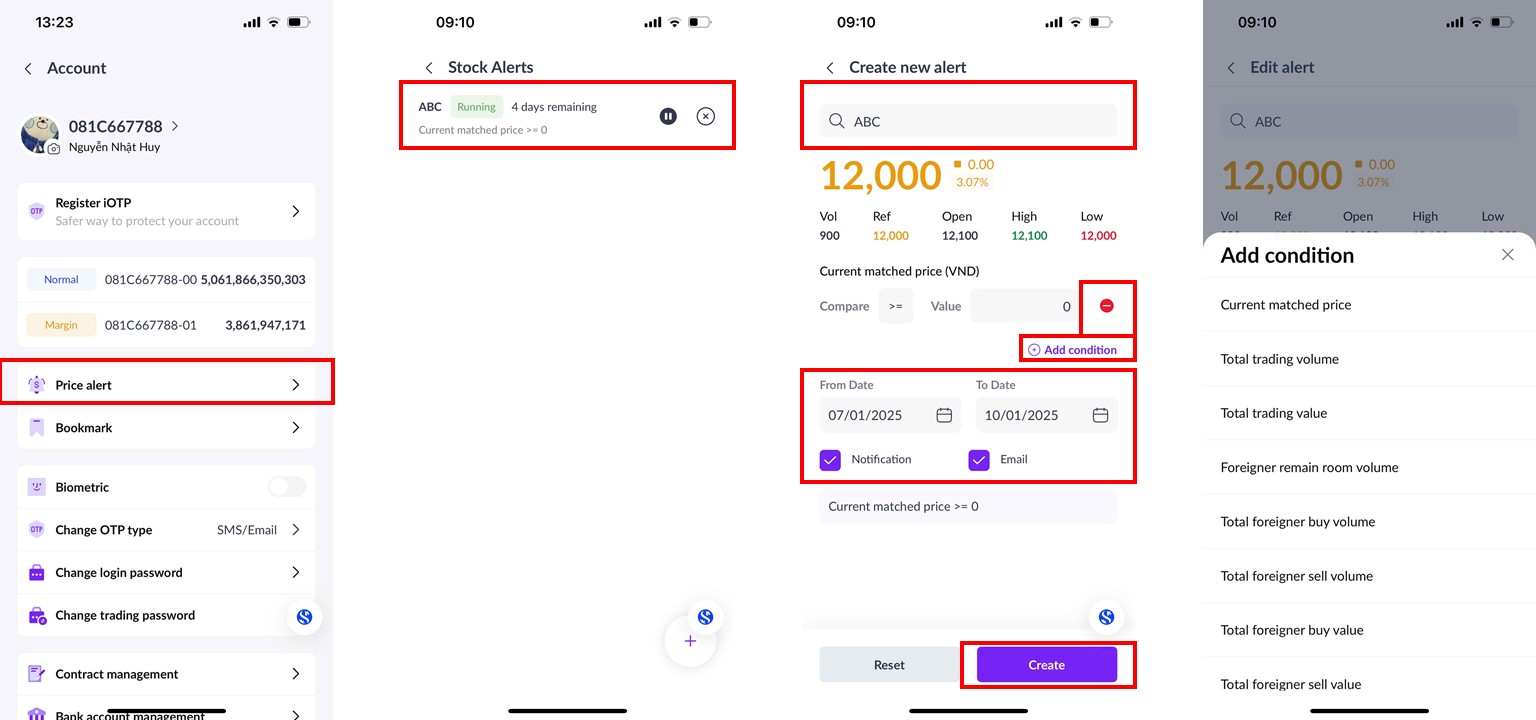
Method 2: Create and manage alerts through the [Account] section as follows:
- Step 1: On the [More] screen, select the account icon
 .
. - Step 2: In the [Account] screen, choose [Price Alerts].
- Step 3: In the [Price Alerts] screen, you can manage existing alerts by pressing the “x” icon to delete an alert, pressing the [Create New Alert] button or “+” icon to create a new alert, or pressing the “||” icon to pause an alert.
- Step 4: Select the stock code you wish to monitor and press [Add Condition] to proceed.
- Step 5: Choose the condition for the alert. Set the condition parameters under [Compare] and [Value]. You can add additional conditions by pressing [Add Condition] or remove conditions by pressing the “-” icon.
- Step 6: Select the timeframe for monitoring and the notification method via [Notification] and [Email].
- Step 7: Press [Create New Alert] to finalize the setup.
Additionally, you can adjust an existing alert by selecting it, modifying the conditions, and pressing [Edit] to save changes.
- Market Movements: Go to the [Overview] section on the [Home] screen (1).
- Stock Performance in Favorite/Owned Portfolio: Access the [Market] section on the [Home] screen (2).
- SSV’s Recommended Portfolios: Check the [Recommendation] section on the [Home] screen (3).
- Market News: Find updates in the [News] section on the [Home] screen (4).
- Today’s Events: View the [Events today] section on the [Home] screen (5).

- Price Board: Go to [Market] and select [Price Board].
- Stocks by Sector: Go to [Market] and select [Industries].
- ETF Funds: Go to [Market] and select [ETF].
- Listed Bonds: Go to [Market] and select [Bonds].
- Covered Warrants: Go to [Market] and select [CW].
- Negotiated Transactions: Go to [Market] and select [Put-through].
The Favorite Watchlist is a list you create to easily track your preferred stock codes. To create a Favorite Watchlist, please follow these steps:
- Step 1: On the [Home] screen, press the “>” button in the [Market] section or directly select the [Market] button from the list below.
- Step 2: Press the menu icon
 and select [Create New List].
 - Step 3: Enter a name for the new watchlist and press [Create].
- Step 4: Press [Add Symbol] to search for your favorite stocks, then press the icon
 to add the stock to the list.
 To manage your watchlists and add or remove stock codes, please follow these steps:
- Step 1: Press the menu icon
 and select [Manage Watchlists].
 - Step 2: Use the icon
 to rearrange the order of watchlists for prioritized display from top to bottom, or use the icon
  to adjust the watchlist name.
 - Step 3: To remove a stock from a watchlist, press the icon
 next to the stock you wish to remove.

When you click on a stock code or press the [Stock Info] button, you can choose to view detailed stock information in either [Lite] or [Pro] mode.
- Stock Information in [Lite] Mode includes:
- The stock value and related price information.
- Charts with selectable timeframes to track price movements and fluctuations over specific periods.
- Transaction information, including the correlation between buying and selling parties, as well as key trading indicators based on the selected time period.
- Income reports based on the chosen timeframe.
- News, company information, leadership, and main products.
 The sector the stock belongs to, recommended investment portfolios, and competitor companies within the same industry.
- Stock Information in [Pro] Mode includes all the information in [Lite] mode, plus:
- Dividend events, shareholder meetings, etc.
- Company indicators, where a green check “ü” indicates positive performance and a red cross “û” indicates unsatisfactory conditions.
- Information on trading volume, net buying value, and market sentiment comparison indices.

1. Placing Orders / Switching open-end fund
A. Buy Orders
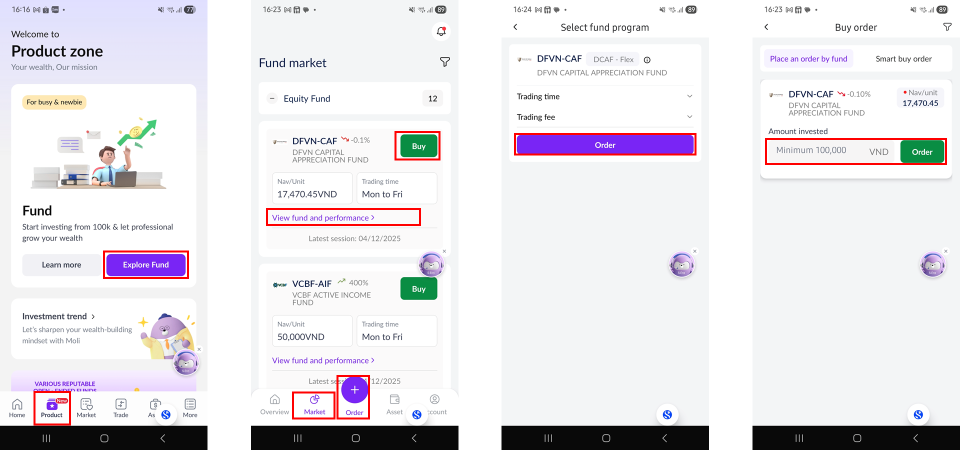
- Step 1: Log in to the San Xin Ha application, select [Products], and choose [Explore Funds].
- Step 2: Select and place a fund certificate buy order using one of the following methods:
+ Select [Order], then choose [Buy]; or;
+ Select [Market], choose the fund certificate, and tap [Buy].
- Step 3: Review the fund information and transaction fees, then tap [Order] to proceed.
- Step 4: Enter the amount invested (please note the required minimum buy amount), then tap [Order].
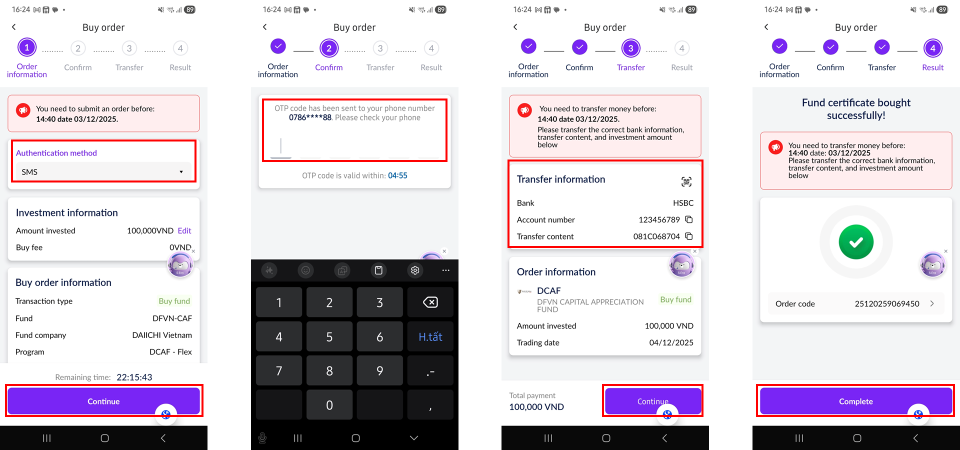
- Step 5: Select the order confirmation method and tap [Continue].
- Step 6: Enter the OTP to confirm the order.
- Step 7: Transfer the purchase amount and tap [Continue]. The order will only be matched after the client completes the fund transfer within the prescribed time period.
- Step 8: Tap [Complete] to finalize the order. The buy order will be displayed under [Pending Order].
- Step 9: Once the order is successfully matched, you will receive a notification via email.
B. Sell Orders:
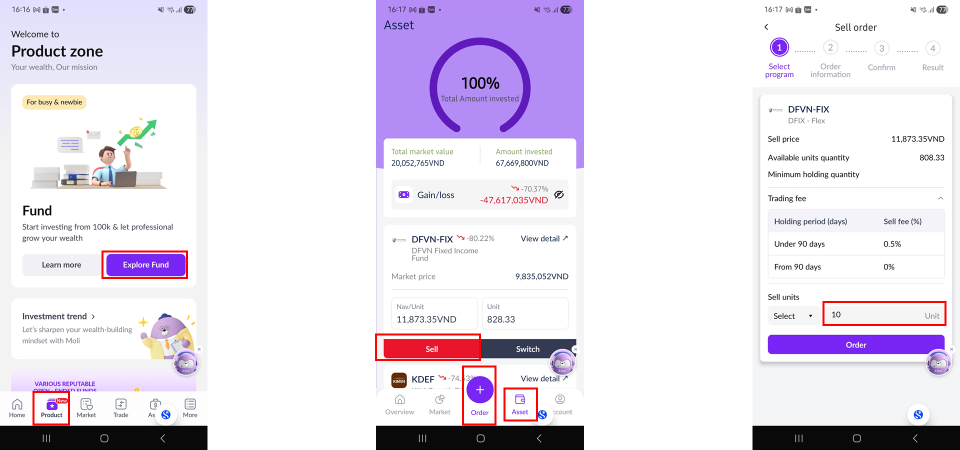
- Step 1: Log in to the San Xin Ha application, select [Products], and tap [Explore Funds].
- Step 2: Select and place a fund certificate sell order using one of the following methods:
+ Tap [Order], then choose [Sell]; or
+ Select [Assets], choose the fund certificate to sell, and tap [Sell].
- Step 3: Review the fund information and transaction fees, then tap [Order] to proceed.
- Step 4: Enter the quantity of fund certificates to sell (please note the required minimum quantity), then tap [Order].
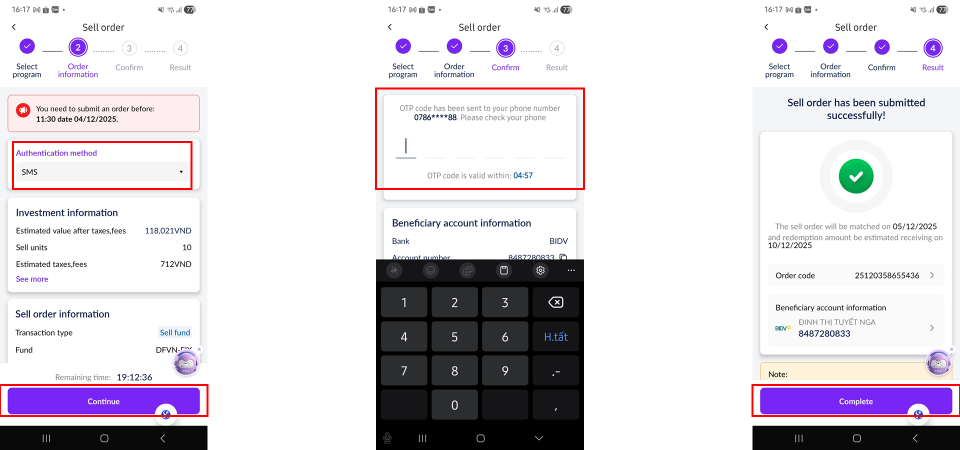
- Step 5: Select the order confirmation method and tap [Continue].
- Step 6: Enter the OTP to confirm the order
- Step 7: Tap [Complete] to finalize the order. The sell order will be displayed under [Pending Order].
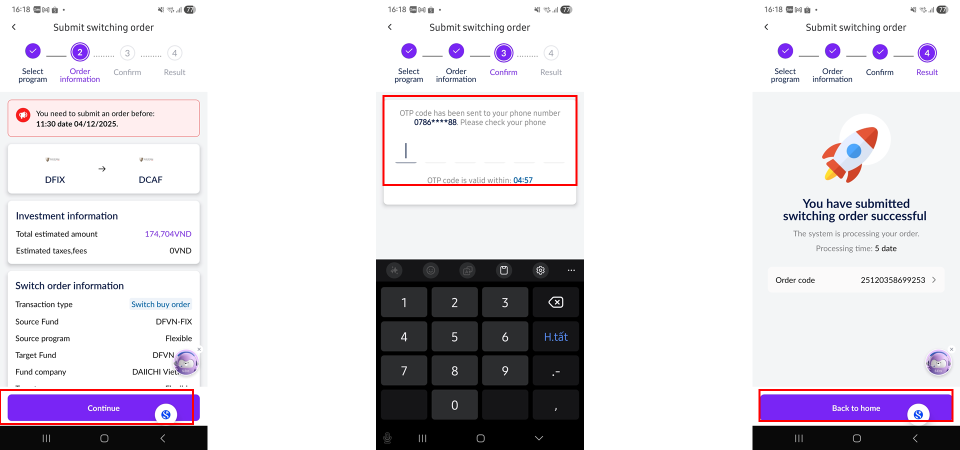
C. Switch Orders
- Step 1: Log in to the San Xin Ha application, select [Products], and tap [Explore Funds].
- Step 2: Under [Assets], select [Switch].
- Step 3: Review the fund information and transaction fees.
- Step 4: Enter the quantity of fund certificates to switch (please note the required minimum quantity), then tap [Switch].
- Step 5: Tap [Continue], then enter the OTP to confirm the switch.

2. Monitoring Fund Certificate Orders
- Step 1: Log in to the San Xin Ha application, select [Products], and tap [Explore Funds].
- Step 2: Select [Overview], then choose [My Order] status as needed:
+ Pending Orders: Displays orders waiting to be matched. You may perform [Transfer], [Scan QR], or [Cancel Order].
+ Matched Orders: Displays orders that have been successfully matched.
+ Unmatched Orders: Displays orders that were not matched
- Step 3: Take actions on [Pending Order] as needed:
+ [Scan QR] or [Transfer]: Used to make payment for buying fund certificate. Only applicable for buy orders where the full payment has not yet been completed.
+ [Cancel Order]: Used to cancel a transaction. Select [Cancel Order] and confirm by selecting [Yes] to complete the cancellation.

3. Open-end fund Asset Status
- Step 1: Log in to the San Xin Ha application, select [Products], and tap [Explore Funds].
- Step 2: Under [Assets], you can view profit/loss and total invested capital.

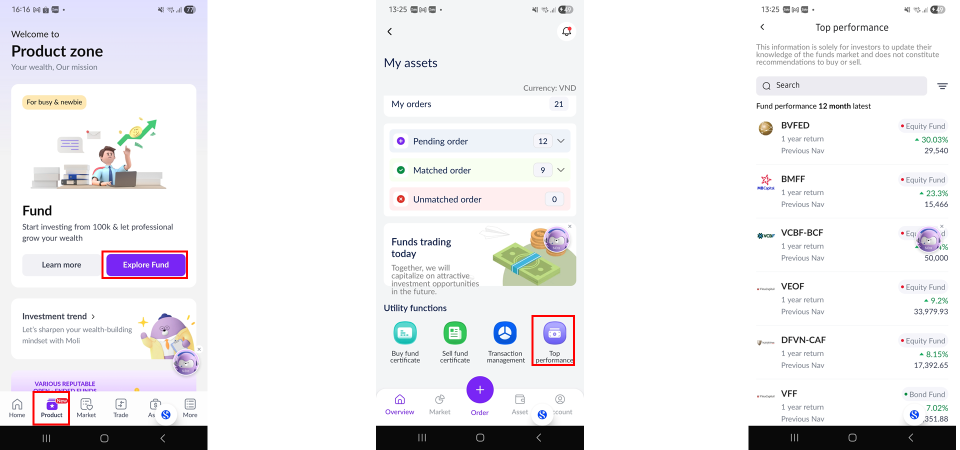
4. Fund Investment Performance
- Step 1: Log in to the San Xin Ha application, select [Products], and tap [Explore Funds].
- Step 2: Under [Overview], select [Top Performance] to view investment results.


 Vietnamese
